¶ Creating a new World
To first create a new world for your server, you need to make sure there is no current world active (The default world that is installed with the server is the Star System world). So first, make sure your server is marked as offline and not currently running.
Deleting Your Current World:
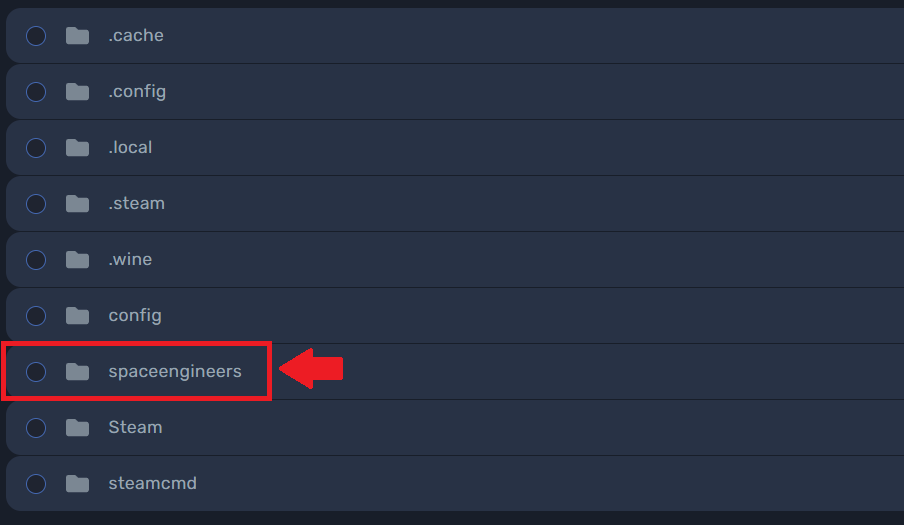
Next up, navigate to the file manger:

Find the config file.
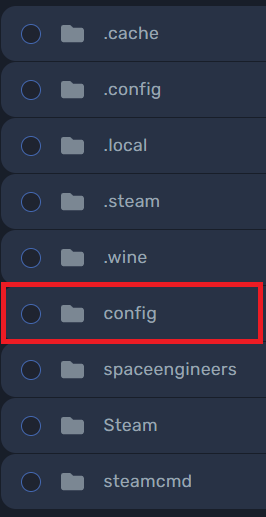
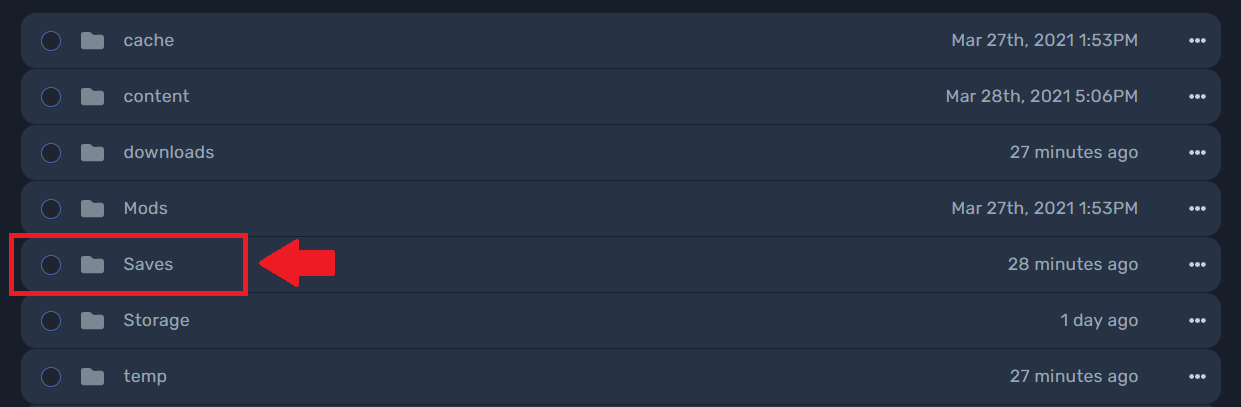
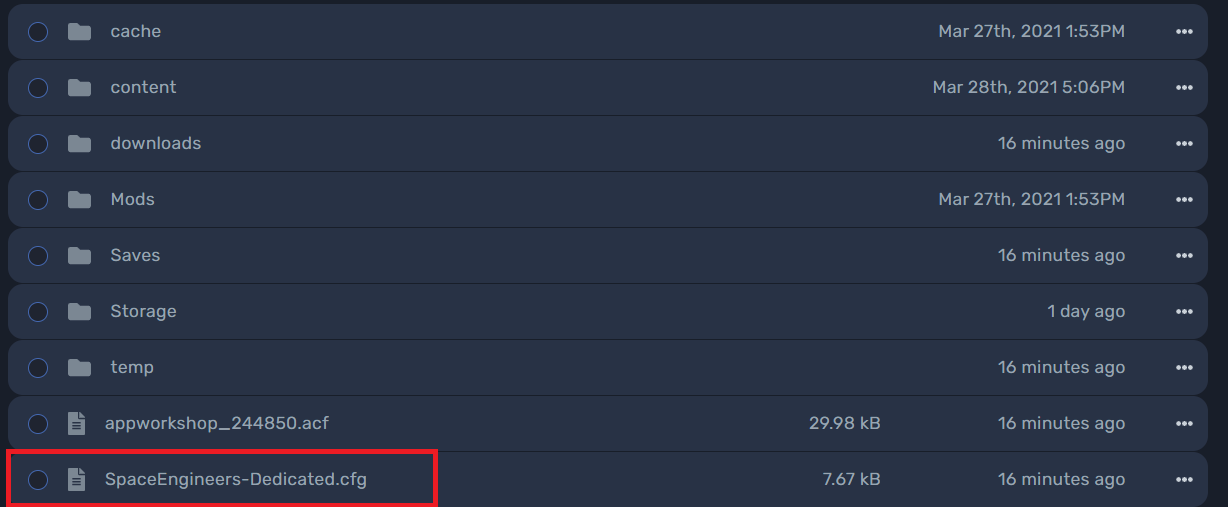
Then find the Save file.

As a precaution, we recommend you create a backup of this default state of the server before you delete anything. To create a backup please view our Sever Backup guide.
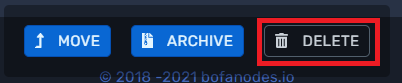
To delete the Save, click on the circle next to the Save file and once you do a little menu will appear at the bottom of your screen with Move, Archive, and Delete buttons. Delete will remove the file permanently.
¶ Adding a New World
If you simply want to regenerate your current world, then all you need to do is start your server back up. This process will take longer than normal as it is trying to generate you a new world.
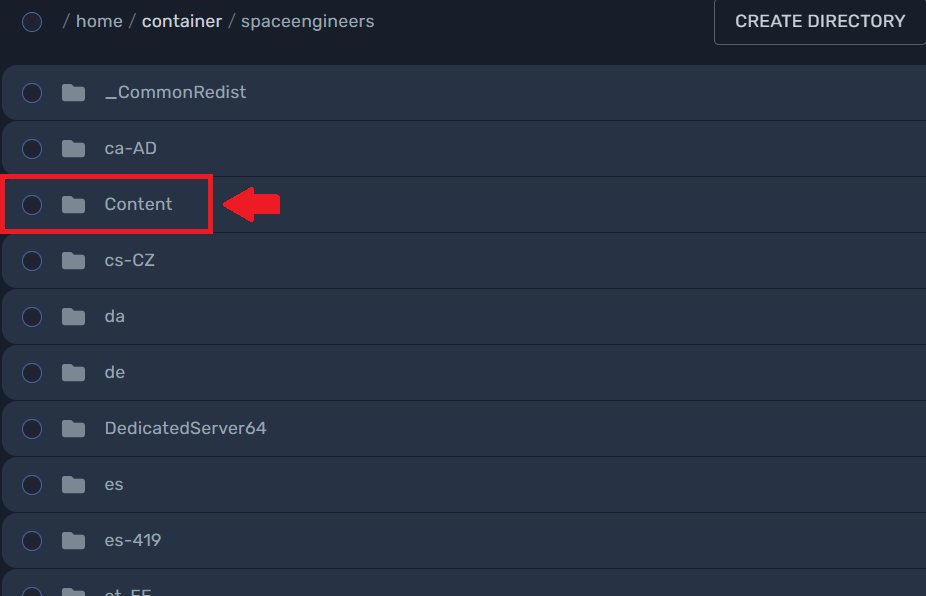
However, if you want a new scenario such as Crashed Red Ship, then you need to go to the File Manager and locate the Space Engineers File
Now find and open the Content file
Now find the Custom Worlds file
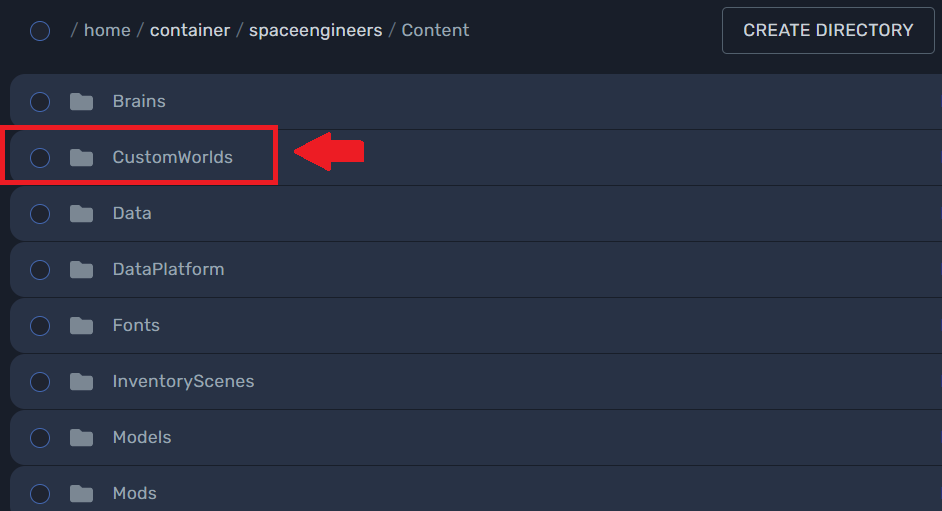
Once inside you should see the names of all the possible scenarios you can choose from. Find the one you want to use and highlight the full name and copy it to your clipboard. For this test we will use Crashed Red Ship.
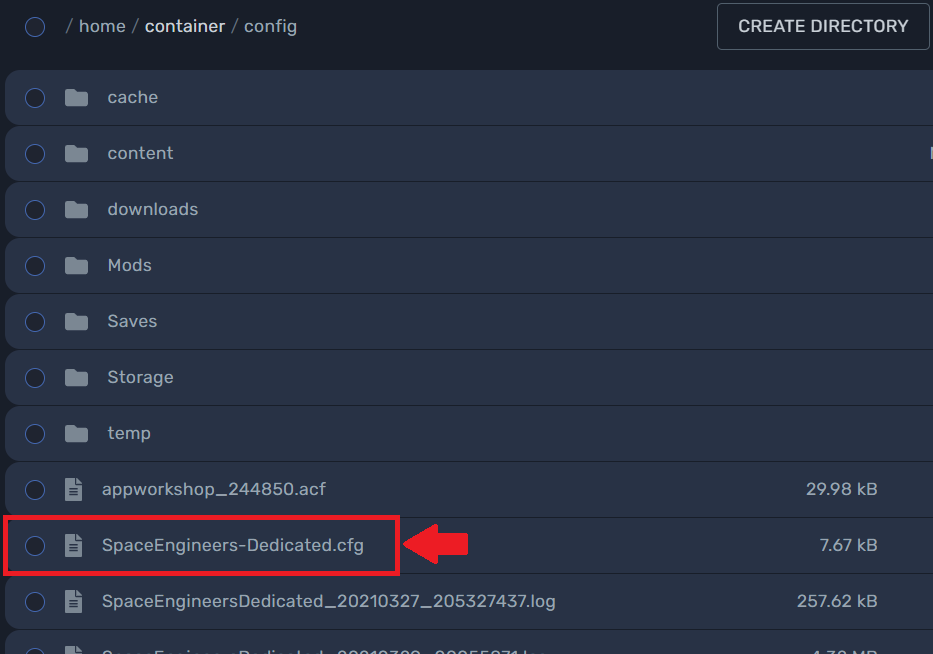
Go back to the root of the file manager and find the config file and open it. Once inside, looks for the SpaceEngineers-Dedicated.cfg file.
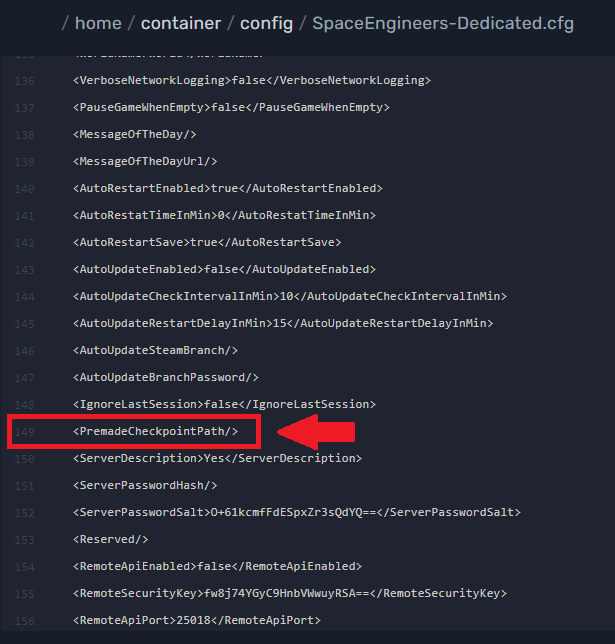
Once inside hit Ctrl+F to open up the search bar and type in "Premade" and it should bring you to this line:
¶ Add Mods to your Server
To add mods to your Space Engineers Server, please first make sure that your server is offline. If it is not offline and you proceed with the following guide, you could cause the time parameter in the world config file to become unsynced with the time in-game, and this will lead Space Engineers to think that this is not the correct Sandbox_config.sbc file for your save. This will make your server unable to start and might require a new world.
To start please go to your server File Manager in the game panel.

Once you click on that you should be able to see your game files, that should look like this:

Once here you will need to locate your current world file, which will be in the config file.

Once inside the config file you will need to find your Save file.
Once here, you need to click on the World folder (or whatever name you have given your world)

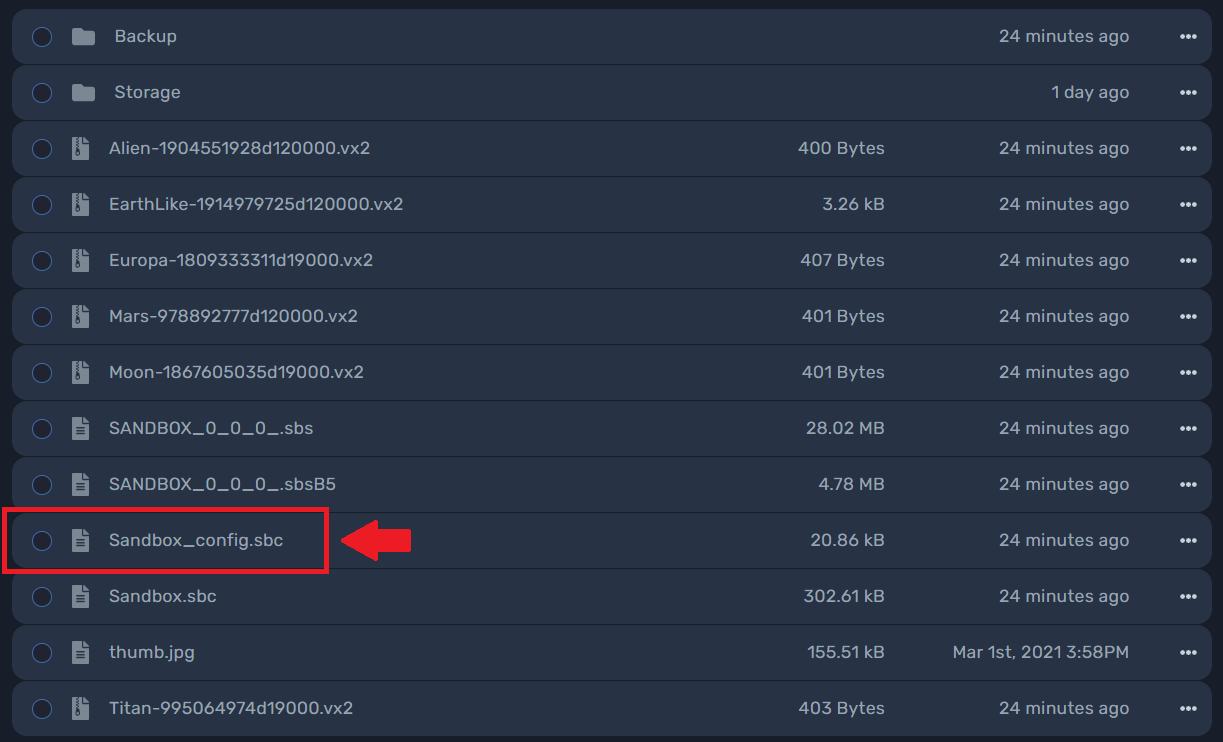
At this point you need to find the Sandbox_config.sbc
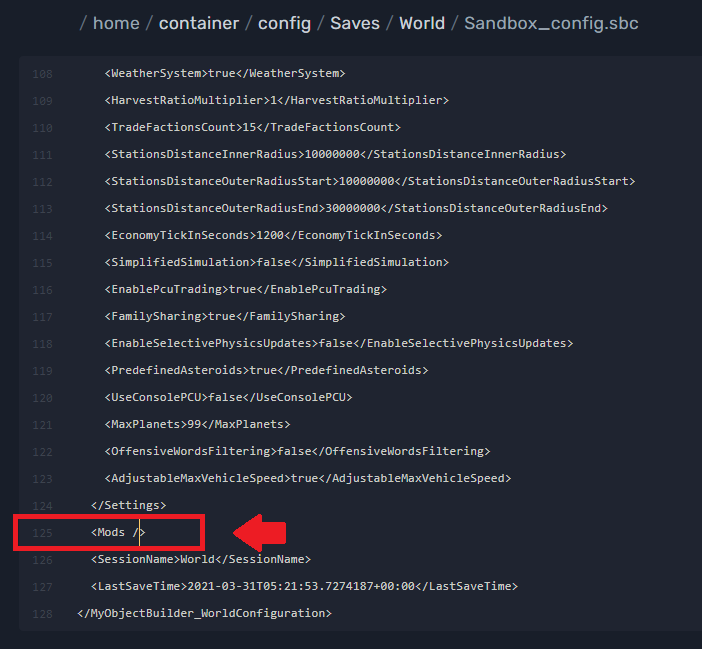
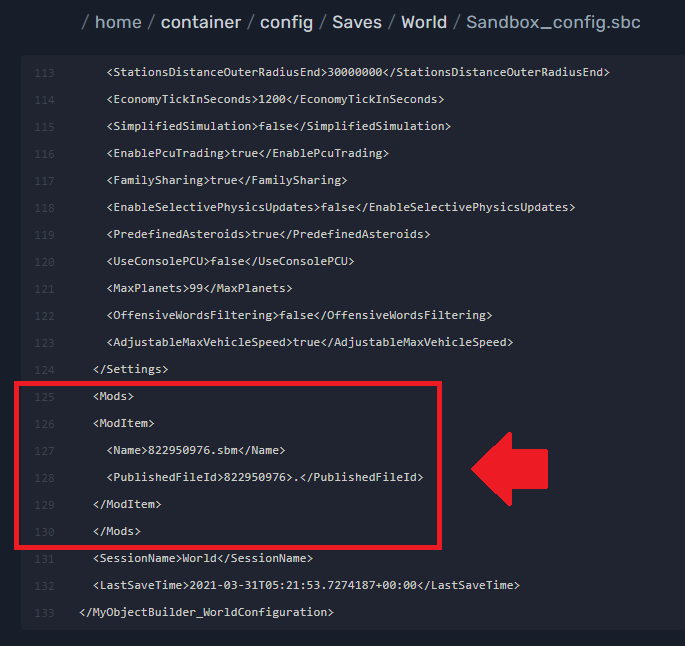
Once inside you will see many lines of text. This is used to modify the game settings such as grinding speed, experimental/spectator mode, etc... For now you should hit Crtl+F to open up the search function and search for "Mods". For me it was under the "" and above the " " lines. That should bring you to the image below.
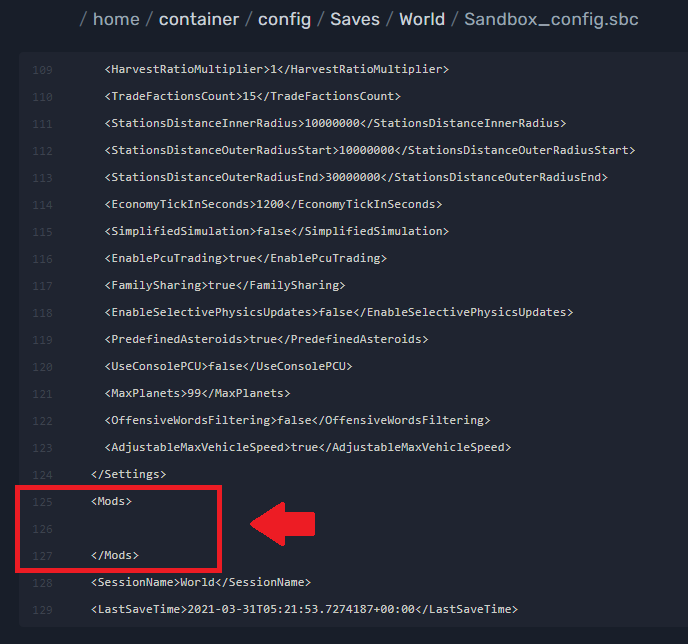
Once you have found this line, change the "" to "", and then hit enter twice to create a space and a new line and add this text "" like so.
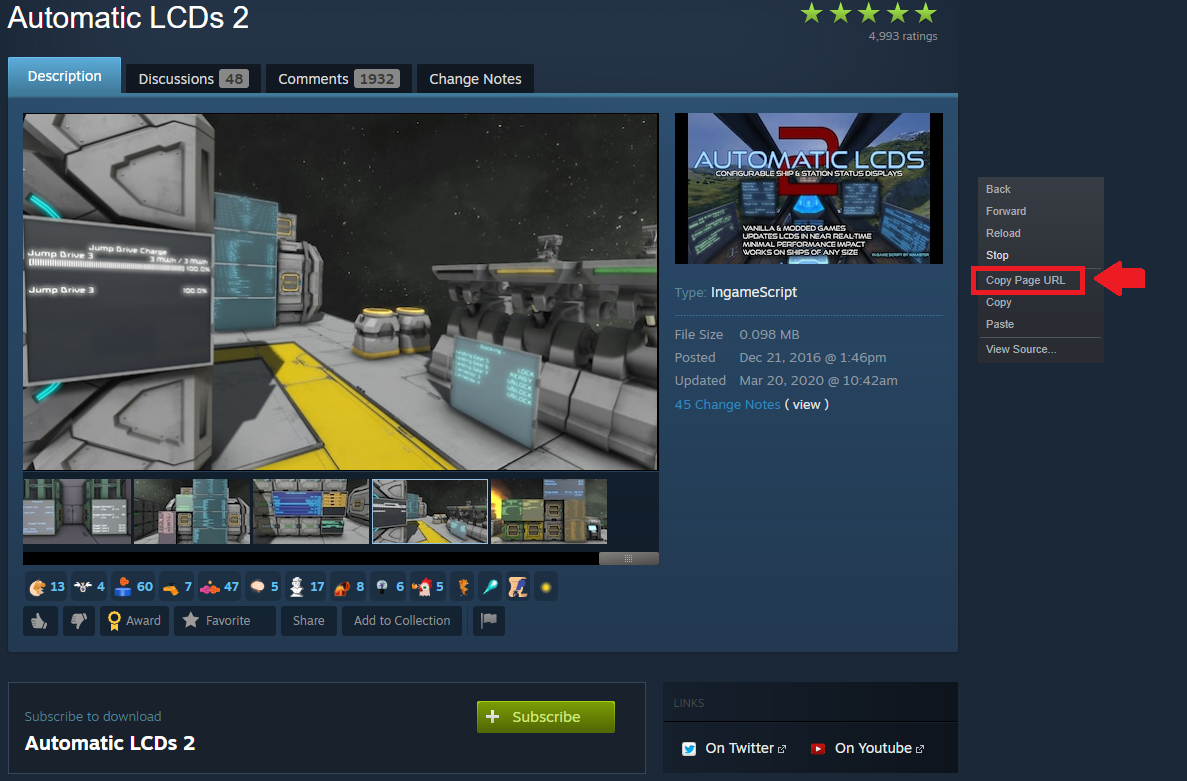
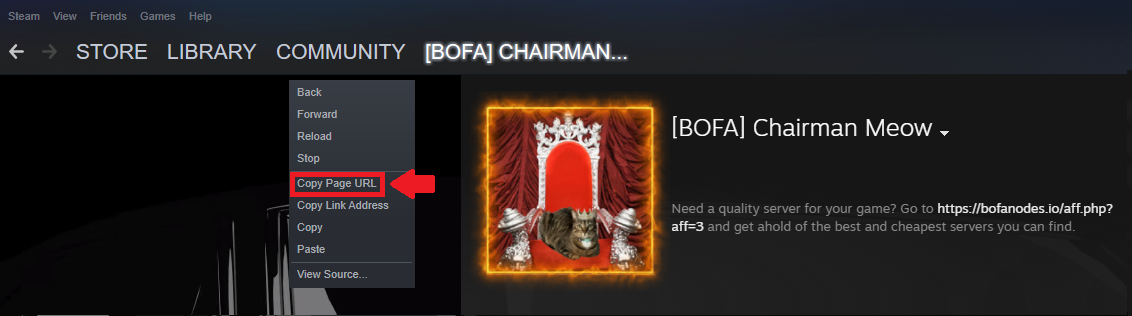
Now, to add the mod itself. Firstly, you need to travel to the workshop on steam and find a mod you want to add to the game. Once you have found the mod and are on its workshop page, right click somewhere on the background to bring up the menu and click Copy Page URL. In this example I am using the "Automatic LCDs 2" mod.
This will copy the url to this mod to your clipboard. Paste it inside a notepad file or some other program to see the full link. What you are interested in is the line of numbers at the end of the link like so.

This number represents this mods unique workshop id. Now copy this number and go back to your Sandbox_config.sbc file. And add in the following text between the space you gave between the "" and "" lines.
<ModItem>
<Name>WorkshopID.sbm</Name>
<PublishedFileId>WorkshopID</PublishedFileId>
</ModItem>
Once you have that in your file you can paste the unique workshop id we got from the mod page URL over the "WorkshopID" lines in the above code. Once done, it should look like this.
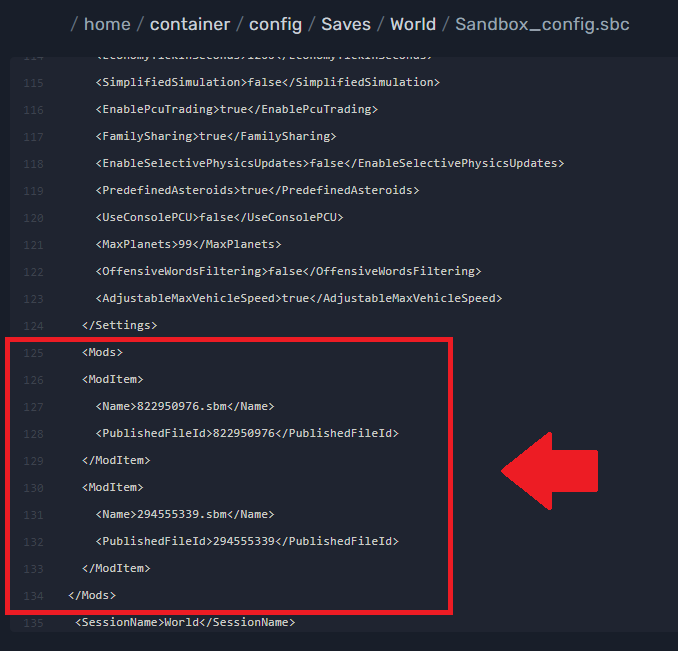
Now if you wanted to use multiple mods, all you would need to do is copy and paste the previous lines we used from "" (Line: 125) to "" (Line: 130) and paste them below the copied lines (create a new line between 130 and 131), then find that other mods unique id from its URL and paste it over the copied id number. For this example I will use the Titan Engine mod, and it should look like this:
Repeat that above step for as many mods as you want. (Be sure to hit save content every once and a while to make sure you don't lose anything.) Once you have entered in all your mods and have saved, you can go back to the main panel console and hit start on your server.
Warning: Not every mod that you get the ID for will work. Some mods are out of date with the current build of Space Engineers and will not work and will prevent the server from running. It is our advice that you enter in each mod you want and then start the server to make sure it works. For the most part as long as the server does not crash, you can use the mod. We have not noticed any issues with entering in mods that require others to work.
¶ Add Your Server To Steam Favorites
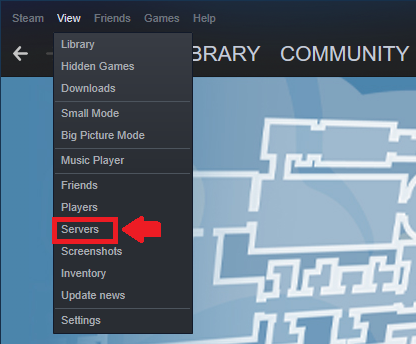
To add your server to steam favorites, you have to first load up steam and navigate to the top left corner where you see the Store and Library icons like so:

Then, click on the view icon and find the Servers tab.
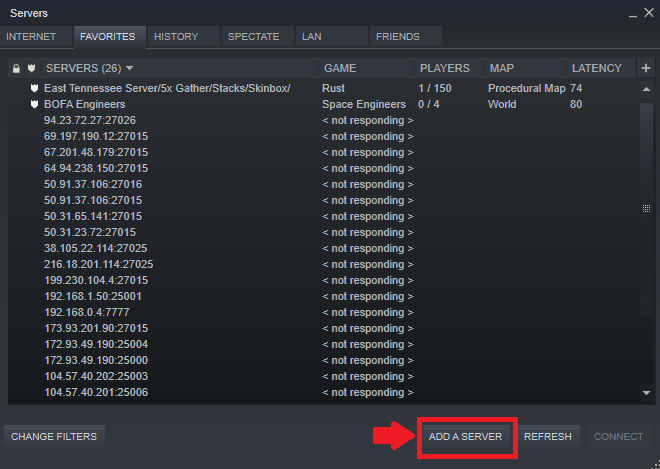
Click on the Servers icon and it will bring up this:

Now, click on the add servers button at the bottom right corner of the application
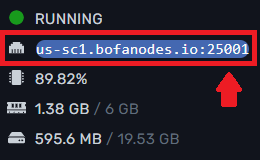
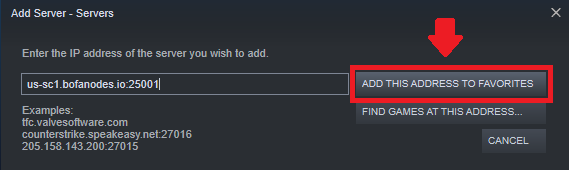
This will bring up another application that will ask you to input the IP address of your server, open your server up in the panel and navigate to the top left corner. Your IP address will be listed under your severs current status.
If you click on it it will copy the IP to your clipboard. Now, go back to the server IP application and paste it into the empty field and click "Add This Server to My Favorites".
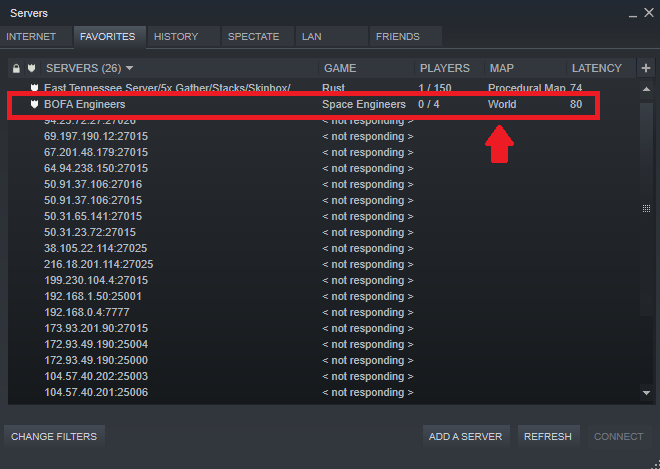
If this is successful, your server should show up in your server list like so.
¶ Connect to your Server
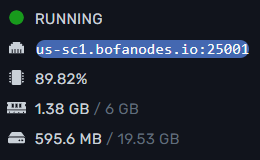
To connect to your Space Engineers Server, please check that your server is currently running. you can check if your server is online by navigating to the game panel for that server and check the top left corner if the green light is on and has the text running next to it, as seen below.
If your server is running then to connect to it, all you must do is click the Join Game button in the main game menu.
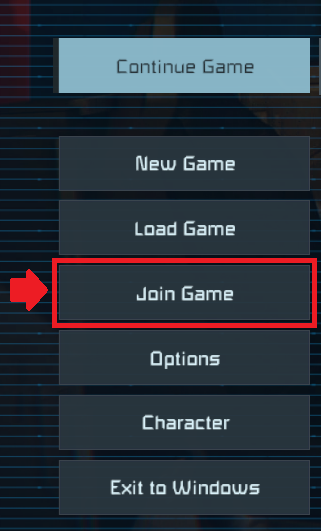
Then click on the search bar and type in the name of your server that you gave it in the panel. For our test server we would type in "bofa".

Then all that is left for you to do is click the join button and wait for you to enter the game!
¶ Enable Admin
Make sure that your server is not running while trying to make these modifications.
To become an admin for your Space Engineers Server, you first need to navigate to your steam profile and right click in the background and copy your page URL like so:
In that URL you will find a line of numbers at the end of the link, for example: steamcommunity.com/profiles/123456789/
The numbers at the end are what we will need to enable you to become an admin
Now go to the File Manager for your server:

Then find the config folder

Now open the SpaceEngineers-Dedicated.cfg file

Once in the folder hit Ctrl+F to open the search bar and enter in "Admin" to find the correct line like so:

Once you find and replace it with
<Administrators>
<unsignedLong>SteamID</unsignedLong>
</Administrators>
The numbers from your steam URL are the SteamID so paste them between <unsignedLong> and </unsignedLong> tags
¶ Whitelist your Server
Make sure that your server is not running while trying to make these modifications.
Creating a Steam Group
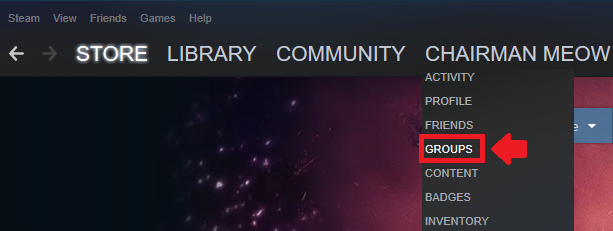
To create a whitelist for your Space Engineers server, you first need to create a steam group. To do so, first pull up your steam client and navigate to the top left corner of the application. There should be a Store, Library, and Community icons visible. Next to the Community icon should be one with your username. Hover over it and it will bring up a small menu, click on the groups button.
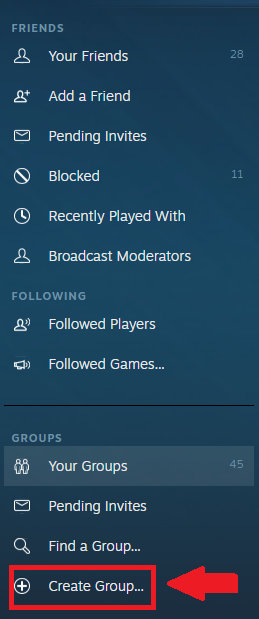
It will bring you to the groups menu. Now we will need create a new group. Off to the left of the list of groups you are in is the options. Near the bottom will be the "Create Group" button, and click it.
When you do this, it will bring you to the group creation page. Enter in the information you want for you group. Though, if you want your server to only be accessible to you and your friends, you should make it private.
Finding your Steam Group ID
Now, you are going to need to find your ID so the server knows to grant you access. To find it, make sure you are on your groups page on steam. Look at the bottom of the right menu and you should see a the "Edit Group Profile" button. Click on it and on the page it brings you to, your ID should be listed on the top. So make sure you copy it.
Applying the WhiteList
Now that you have your ID, bring up your server on the panel and go to the File Manager.

Now open the Config file.

Then open your SpaceEngineers-Dedicated.cfg file.

Once inside, use the Ctrl+F search bar to search for "OnlineMode" to change it to private and "Group" to change the ID there to the one you copied from your steam group. Once this is done you can save and start your server back up and now it while only allow those in the steam group access!
¶ Change the Message of the Day
Make sure that your server is not running while trying to make these modifications.
To change the Message of the Day in your server go to the File Manager in your server panel.

Now find the config file.

And then find the SpaceEngineers-Dedicated.cfg file.

Once inside the file hit Ctrl+F to bring up the search bar and type in "MessageoftheDay" and it should find this line:
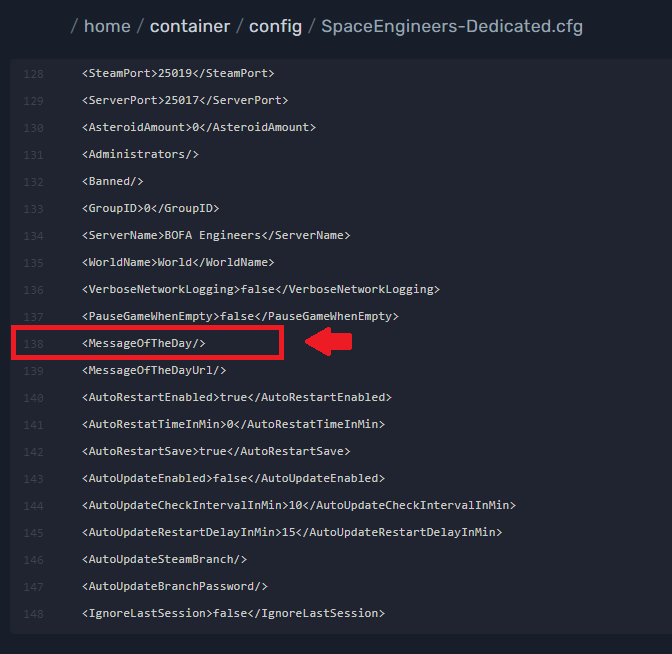
Once you find that line, change the to be
Message of the day.
Anything you put between the and tags will be the Message of the Day.
¶ Change your Server Name
Make sure that your server is not running while trying to make these modifications.
To change the Server name, you need to go to the file manager.
From there find your Config file.

Once inside, locate your SpaceEngineers-Dedicated.cfg file

Once inside, hit Ctrl+F to pull up the search bar and search for "ServerName" and it should bring you to this line:
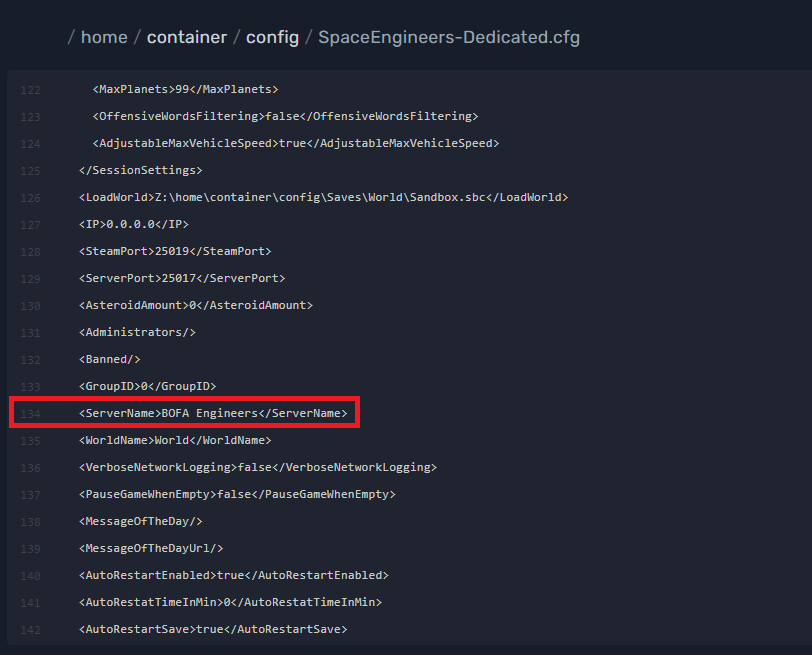
Once here you can edit the name between the and the tags, and this will change the name of your server.
¶ How to import a Single Player World
Make sure that your server is not running while trying to make these modifications.
Finding your Save File
To be able to import your Single Player world into the server first we must find your Save folder on your computer.
First, press the windows key + R to open the "Run" program. It should look like this:

Inside the bar, type in "C:Users/*YourProfile*/AppData/Roaming" and make sure to put your user where we have *YourProfile* and then hit ok.
It should bring up a windows explorer and scroll down to where the SpaceEngineers folder is. Once you find it open it find the the Save folder.
Once inside it will present you with a series of numbers that should match your steam profile, go inside that folder and it will then give you different folders with starting scenario names. Find the file with the correct date attached to it and make copy it and paste it to your desktop.
If you want you can change the name of that folder on your desktop, but know that this will be a name that everyone will be able to see.
Inserting your Save File
Once you have your save file, load up your server on the panel and go to the File Manager

Then open the Config file

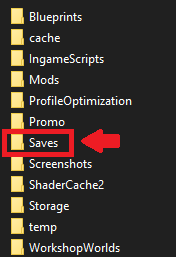
Then go into your Saves folder

Once here upload that copied save file that we found previously.
Then go back to the config root and find the SpaceEngineers-Dedicated.cfg file.
Once inside use Ctrl+F to pull up the search bar and put in "WorldName" to find the world name setting.
In that area, put the new name of the world you just imported. When you have done that and saved, you should just need to start your server back up and it should load with the new world from your single player!